Making Audiobooks
May 12, 2017
We’re a read-aloud family. Every night before bed, each of our kids gets some read-aloud time with a parent. I have one book I’m reading with my son, and another one I read with my daughter, and Becky does the same. This has a whole host of benefits — I get to read some of the classics I missed as a kid, the kids get access to stories they’re not ready to read themselves yet, and we all enjoy some really quality fiction without the need for it to be coming from a screen. The kids are both such big fans of this kind of storytelling that they have iPods full of audiobooks, which they get to pull out on long car rides, or when they’re hanging out in their rooms.
A while ago, my son went to live in another state, and our contact with him started being very tightly controlled. Reading aloud just wasn’t going to work. So we decided to record ourselves reading books to his sister, and providing them to him on his iPod.
The end result is magical. He loves it. He listens to us reading books out loud over and over, and it gives him that taste of being at home, right down to the background noise — the sound of me doing the dishes, the dogs walking around the room, his sister asking questions. Moments like this:
It took me a bit of research to figure out how to do this, so I thought I’d write it down so others could have an easier time than I did.
The Stupidest Thing That Could Possibly Work
The process I’m going to outline below is kind of involved, but it puts out a really great audiobook that looks and feels like it came from Audible. If you don’t want to mess around with all of the weird stuff, and just want to record your voice and put it on a device, just use the voice recorder on your phone. Record the whole book as one long track, export it to mp3, and skip to Step 3.
If you want the real deal, read on.
Step 1
Record yourself reading the book aloud. I’m using GarageBand on a Mac, which isn’t perfectly suited to this task, but it’s free and does an okay job. Here’s what it looks like about ¾ of the way through Where the Red Fern Grows:
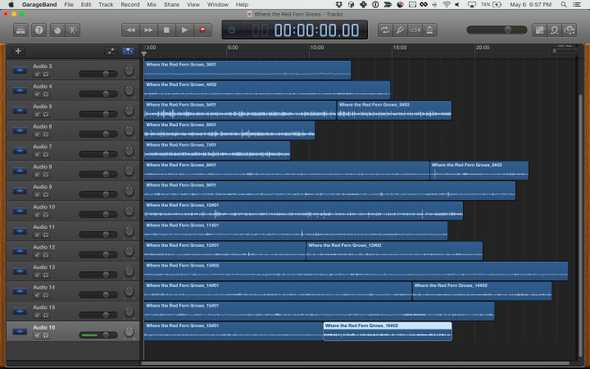
When you’re recording, it helps to make each chapter its own track. When you’re sitting down to read for the first time, create a new track, hit record, and start jabbering. For the next chapter, create a new track, solo that track, and hit record. “Soloing” means that you’re muting all the tracks except the one you’re recording in. (Remember, GarageBand is designed for making music, so you’d want to hear the drums while you’re recording the guitar.) Here’s the “solo” button, which looks like a set of headphones. The one with the golden headphones is the only track that will play while I’m recording.
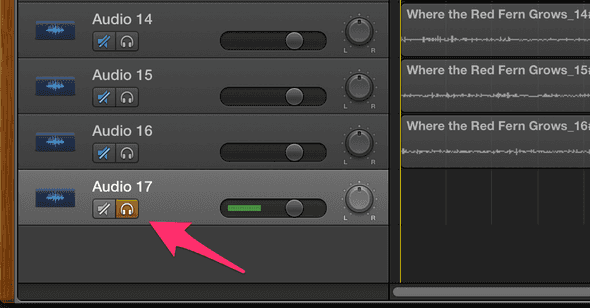
Note that you can “solo” multiple tracks, which isn’t really what “solo” means, but whatever. You’ll want to make sure only one track is marked as “solo” when you’re recording.
Sometimes during this process I’ll stop and clean up the beginnings and ends of recording blocks, to get rid of the loud sound it makes when I hit the spacebar, or the pause while I’m getting settled. You can get as picky as you want with this; I mostly leave it alone. The point of this isn’t to make an Audible-grade recording, it’s to simulate some togetherness, and having messy audio actually helps with that.
Step 2
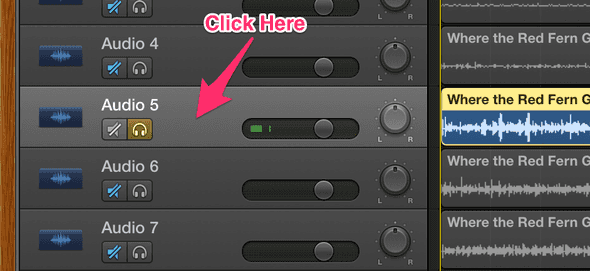
When you’ve finished recording the book, now you’re ready to export all the files. This is a multi-step process. First, solo the track, and make sure all of its snippets are selected by clicking on the empty gray area around the “solo” button.
Next, go to Share > Export Song to Disk…, and make sure this checkbox is checked:
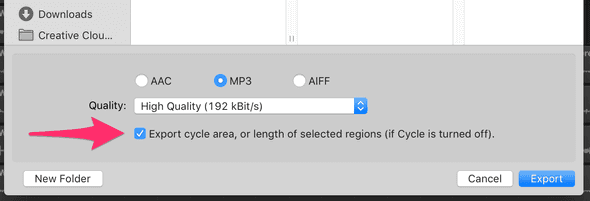
What this does is make it so the MP3 you’re exporting starts when the selected snippets start, and ends when they end. Book chapters aren’t all the same length, but GarageBand is designed for music, where the song is the same length no matter which parts of it you’re exporting right now. If you don’t check this box, your MP3 will export with a bunch of silence at the end.
The next thing to do is choose a good filename. This is important — the filename will become the chapter title when you look at the audiobook in iTunes or iBooks. I usually title them something like “Chapter 1”, or maybe “Chapter 1: The Bad Beginning” if I’m feeling ambitious.
Repeat this process for every chapter. Put them all in a single folder – I usually just use my desktop. It’s tedious, but at the end you’ll be all set up for…
Step 3
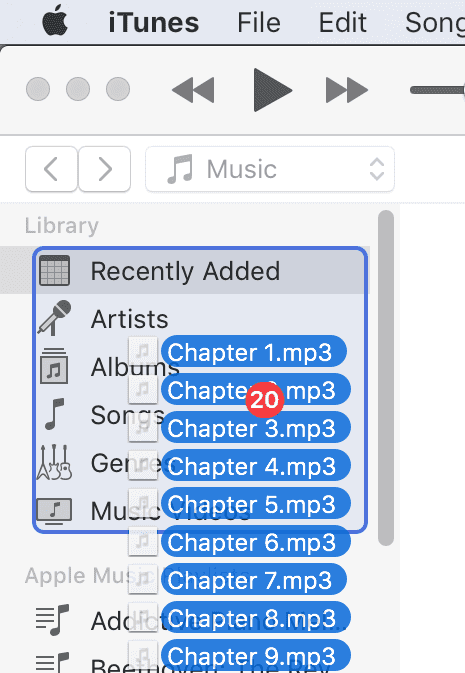
It’s time to turn a raw collection of MP3 tracks into an actual audiobook. First, select all of the MP3 files you just exported, and drag them into the library area in iTunes.
Next, go and find the Recently Imported playlist, which is under Library at the top, then Music in the pull-down at far left.
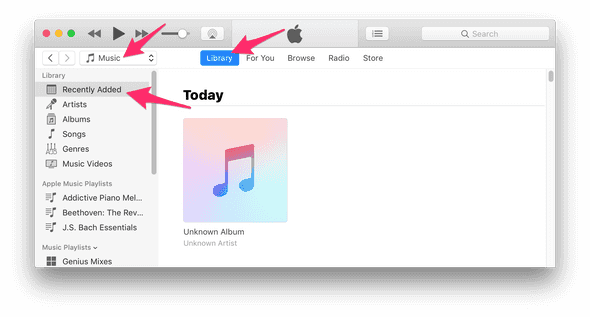
You should find an “album” called Unknown Album there. This is your new audiobook! Right now iTunes thinks it’s a collection of music tracks, though, so you have to tell it otherwise.
Before you do the next step, open up a web browser and find a picture of the cover of the book you read. I usually go to Amazon, search for the title, and open the first result. If you click on the first image in the list on the left, you’ll get a nice copy of the cover art. Right-click on it, and pick Copy Image.

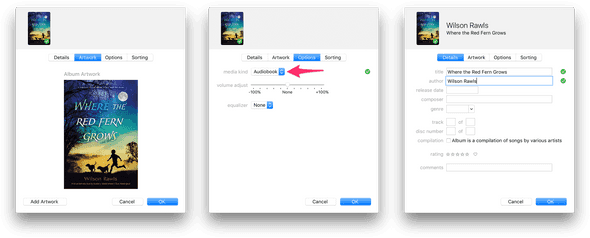
Now go back to iTunes, right-click on the album, and select Get Info. First visit the Artwork tab and hit ⌘-V or ctrl-V to paste in the cover art. Next visit the Options tab, and change the “media kind” to Audiobook. Finally, go to the Details tab, and type in the title and author names, and hit OK.
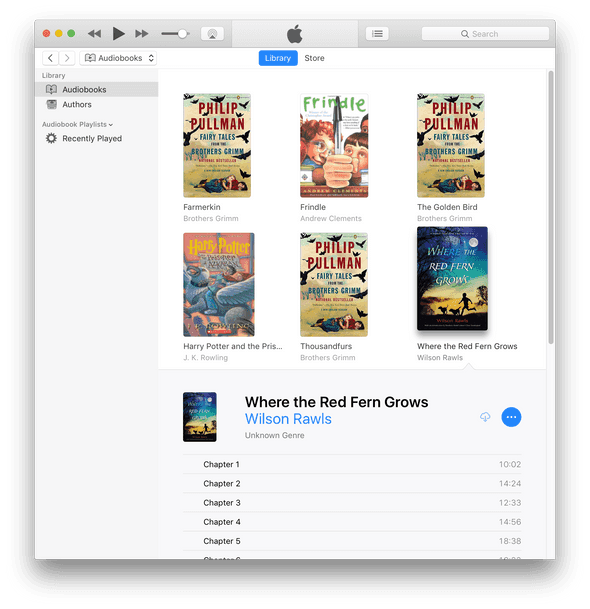
Once that’s done, it’ll look like your tracks disappeared, but really they’ve just moved. Select Audiobooks from the drop down at top left, and you’ll find it there:
Step 4
All that’s left to do is get this audiobook onto the device where you want it. In my case, I’m going to sync it over to my son’s iPod, where it’ll show up in the iBooks app.
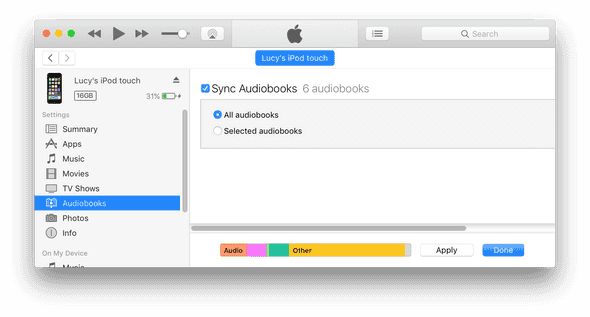
This is as simple as checking a couple of boxes. Plug in the target device, select it in iTunes, go to the “Audiobooks” tab, and configure it to sync all audiobooks. Sync the device, and you’re done.
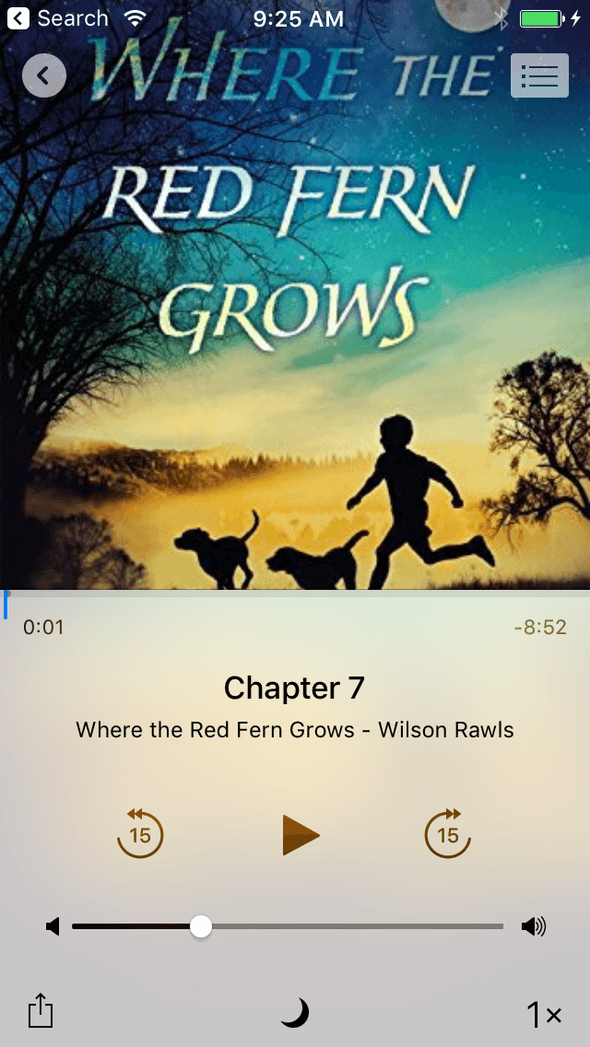
You should be able to open up iBooks on the device, and find your audiobook waiting!
Notes on gear
I’m writing this from how I know to do it, which is on a Mac and an iPod, using all the Apple software that comes with those. If you’ve done it using other stuff that works better, or found out how to make it work on Windows, let me know so I can update this article.
So about sound quality: you don’t really need anything besides a computer and a phone to make this work, but built-in microphones will seriously limit you if you do more than one recording. The next step up is a $30 headset you’d use for making Skype calls. It’ll be better, but not much; you’ll still sound like you’re on the phone.
At the $60-75 level, you really start sounding good. I use the Samson Meteor which is $70-ish. It’s a condenser mic, though, which means it’ll pick up lots of background noise; in my case, that’s exactly what I wanted, but your desires might be different. Also check the Wirecutter for advice on how to choose a microphone.
Ben Straub lives and works in Portland building useful things. You should follow him on Twitter.